/*
 TDI 2020 basic blinky code

  Turns on LED's

by @techGirlMN
*/
int activeLED = 2;
int activeLED2 = 8;
int buttonState = 0;

// the setup function runs once when you press reset or power the board
void setup() {
  // initialize digital pin LED_BUILTIN as an output.
  pinMode(2, OUTPUT);
  pinMode(3, OUTPUT);
  pinMode(4, OUTPUT);
  pinMode(5, OUTPUT);
  pinMode(6, OUTPUT);
  pinMode(7, OUTPUT);
  pinMode(8, OUTPUT);
  pinMode(10, INPUT);
  Serial.begin(9600);

}

// the loop function runs over and over again forever
void loop() {

  buttonState = digitalRead(10);
Serial.println(buttonState);
Serial.println(activeLED);
Serial.println(activeLED2);
  if (buttonState == HIGH) {
      activeLED2=activeLED;
    digitalWrite(activeLED, HIGH);   // turn the LED on (HIGH is the voltage level)
    delay(250);                       // wait for a second
    digitalWrite(activeLED, LOW);    // turn the LED off by making the voltage LOW
    delay(250);
    activeLED = activeLED + 1;
    if (activeLED >= 9) {
      activeLED = 2;
    }

  }
  else {
    activeLED=activeLED2;
    digitalWrite(activeLED2, HIGH);   // turn the LED on (HIGH is the voltage level)
    delay(250);                       // wait for a second
    digitalWrite(activeLED2, LOW);    // turn the LED off by making the voltage LOW
    delay(250);
    activeLED2 = activeLED2 - 1;
    if (activeLED2 <= 1) {
      activeLED2 = 8;
    }
  }
}
/*
* A simple LED chase sequence animation.
*
* www.lvl1.org - Louisville's Hackerspace, a 501c3 educational non-profit
*
* Twitter: @blenster
* Lightly modified for use on the TDI2020 "off the shelf project"
* By @TechGirlMN
*/
// This is where variables are defined; they will help control what happens
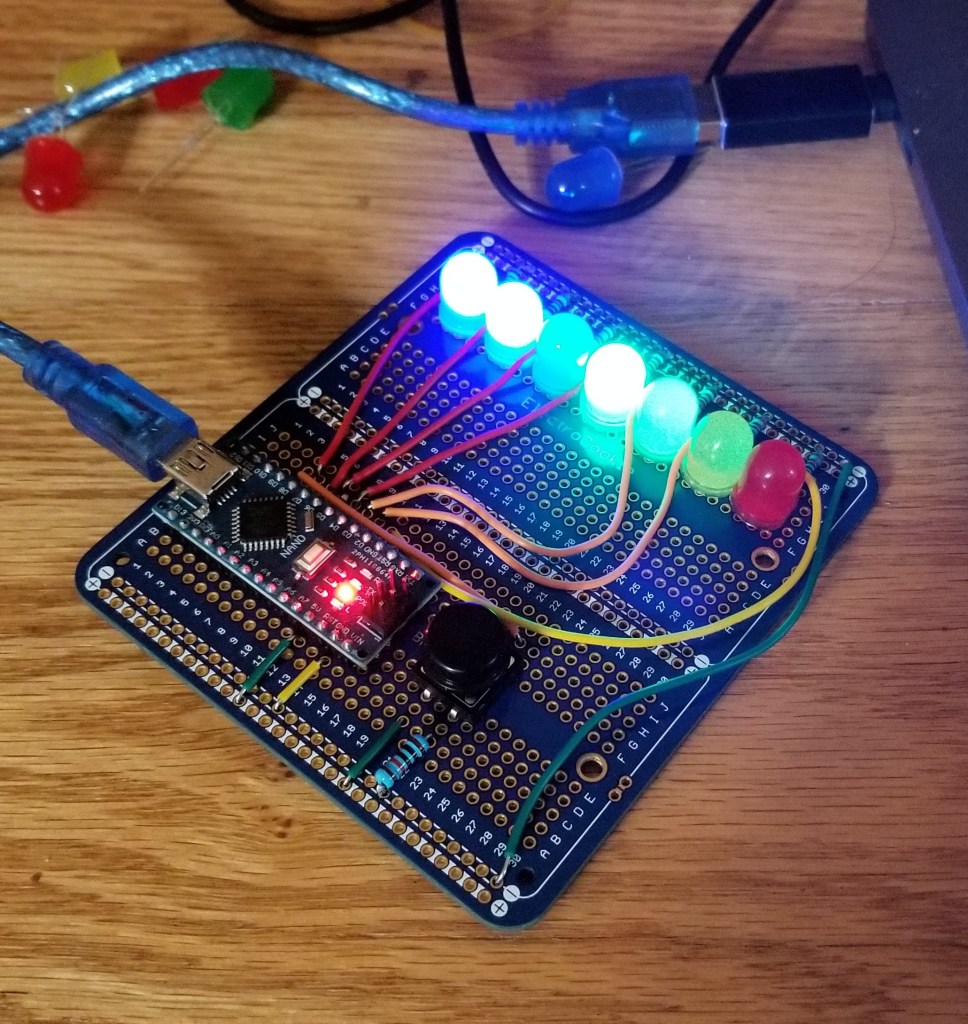
const int NumberOfLEDs = 7; // The number of LEDs in our project
const int LEDPins[] = {2,3,4,5,6,7,8}; // An Array of output pin numbers we are using on the Arduino
const int WaitTime = 150; // The number of milliseconds to wait before continuing the animation
// Feel free to play with this number by making it larger and smaller
// and seeing what happens
// This code runs only once, when we start the Arduino by powering it on or pressing the reset
// button. Use this space to set the initial conditions for the program. For example here we
// will tell the Arduino that we want to use the pin numbers defined in the LEDPins array above
// as output pins that we can send a signal to. This signal will turn the LEDs ON or OFF so
// that our animation displays the way we want it to.
void setup() {
// We will use a loop to set the pin values all together in an efficient way:
// "led" is a temporary variable that we will use to count our turns through this for loop
// Each time we go through this loop we will add 1 to the current value of the variable and
// then we will test to see if that number has gotten too big. The value of led will look
// like this as we go through this code: 0, 1, 2, 3, 4, 5
// Each time this loop executes we will test that number against NumberOfLEDs, which is 6,
// and if the number inside of "led" is lower than 5 we will run the loop again. When we
// reach 6 the loop will no longer do anything.
for (int led = 0; led < NumberOfLEDs; led++) {
// Here's where we tell the pin on the Arduino that we want to use it to send an output signal
// We will do this for each pin in our loop as defined in the LEDPins Array above.
pinMode(LEDPins[led], OUTPUT);
// This code will read each value in the LEDPins Array in turn, making something that looks like
// this when "led" = 0: pinMode(LEDPins[0], OUTPUT); LEDPins[0] is equal to "2" so we end up with
// this: pinMode(2, OUTPUT);
// "pinMode" is a special command that allows us to tell the Arduino that we want to set the pin
// to be an INPUT or OUTPUT -- so we can either listen using INPUT or send out a signal using
// OUTPUT Since we want to tell the LEDs to turn on we need to tell the Arduino we are using
// these pins in the output mode
digitalWrite(LEDPins[led], LOW); // This sets the pins to a default state so the LEDs will be off
// when we start the animation
} // We're finished with the FOR loop here
// If you want to watch the code execute in the Arduino IDE Serial Monitor uncomment this line:
//Serial.begin(9600);
} // We're done setting things up and are ready to move on to the main code.
// This is the main block of code that will run on the Arduino. Each time it finishes it will begin
// again unless we tell it not to. This code will continue to run over and over as long as the
// Arduino is still on
void loop() {
// This is where we will tell the Arduino which LEDs we want to turn on and which to turn off
// Initially we will move from one side to another going up the LEDs from 0 to 5, however when
// we eventually reach the final LED we will need to reverse direction and continue down from
// 5 to 0. Once we reach the first LED again we will once again start to go up using the first
// code section that counts up. This will repeat for as long as the Arduino is on, causing the
// animation to "bounce" back and forth between the two ends of the LED strand.
// This FOR loop counts up the LEDs and turns them on and off to create the animation going up:
for (int led = 0; led <= NumberOfLEDs - 2; led++) {
digitalWrite(LEDPins[led], HIGH); // Turn on an LED
delay(WaitTime); // Wait for the amount of time we set
digitalWrite(LEDPins[led + 1], HIGH); // Turn on the next LED in the sequence
delay(WaitTime); // Wait for the amount of time we set
digitalWrite(LEDPins[led], LOW); // Turn off the first LED we turned on
delay(WaitTime * 2); // Wait twice as long
// This code sends information to the Arduino Serial Monitor if you have enabled the serial
// connection above
Serial.print("led = "); // first we print out some text
Serial.println(led); // and then we add the value of the "led" variable and tell the serial
// monitor we're ready for a new line of text by using "println" instead
// of simply "print" as we used above.
}
// This FOR loop counts down the LEDs and turns them on and off to create the animation going down:
// It is very similar to the first loop but has some differences; can you spot them?
for (int led = NumberOfLEDs - 1; led > 0; led--) {
digitalWrite(LEDPins[led], HIGH);
delay(WaitTime);
digitalWrite(LEDPins[led - 1], HIGH);
delay(WaitTime);
digitalWrite(LEDPins[led], LOW);
delay(WaitTime * 2);
Serial.print("led = ");
Serial.println(led);
}
// From here we repeat the FOR loop that goes UP again
} // This is the end of the repeating loop